
How To
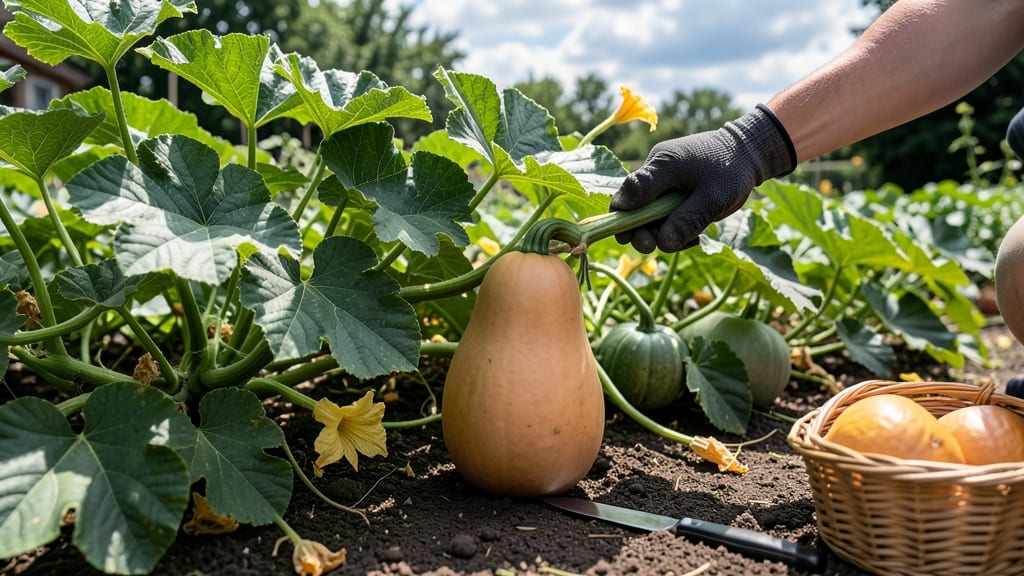
Harvesting butternut pumpkins 🎃 at the right time means the difference between a meal-saver and a storage flop — and most gardeners miss the window by days.
Picture this: you’ve nurtured your butternut pumpkins all season, only to pick them too early and end up with bland, watery flesh, or too late and risk frost damage. The key is knowing when the skin hardens just enough, the stem dries out, and the nail test confirms it’s ready.
I’ll show you how to spot these signs so you never guess again.
Beyond the finger test, factors like day length, soil conditions, and even your local frost dates play a role. In Zone 6a, where first frost hits around mid-October, timing is everything.
A few extra days on the vine can mean sweeter flavor, but wait too long, and you’re left with a mushy mess.
In this guide, you’ll learn the exact visual cues to watch for, how to adjust for your region, and storage tips to keep your harvest fresh for months. Let’s make sure your butternut pumpkins shine at their sweetest.

How to use the finger-nail test for perfect butternut pumpkin harvest timing
Butternut pumpkins are at their sweetest and most flavorful when harvested at the ideal maturity stage, but many gardeners struggle to pinpoint the exact moment. The finger-nail test is my go-to method because it combines tactile feedback with visual cues—no guesswork required.
Unlike checking size alone (which varies by variety), this test evaluates skin hardness and stem condition, two critical factors that determine whether your pumpkin is ready for harvest.
I’ve learned the hard way that harvesting too early means watery, bland flesh, while waiting too long risks overripe pumpkins prone to rot or pest damage. The finger-nail test cuts through the ambiguity by giving you a clear, measurable signal that your butternut is primed for picking.
Let’s break it down step by step so you can master this technique and enjoy pumpkins with peak sweetness every season.
- 1 Choose the right pumpkin: Select a butternut that’s 85–100 days old (check your seed packet for exact days). Look for a dull tan or beige rind—bright green means it’s not ready.
- 2 Press your fingernail into the skin near the stem. Use your thumb or index fingernail—it’s the most precise tool for testing hardness. Apply moderate pressure (not enough to break the skin).
- 3 Assess the resistance: If your nail doesn’t pierce the skin and leaves just a faint indentation, the pumpkin is ready to harvest. If the skin gives way easily, it’s underripe. If it feels rock-hard, it may be overripe.
- 4 Check the stem: A dry, brown stem is another key sign. Gently tug on it—if it snaps easily (rather than pulling out), the pumpkin is ready. A green or pliable stem means wait a few more days.
- 5 Weigh it in your hand: A fully mature butternut feels heavy for its size because it’s packed with dense, sweet flesh. If it feels light or hollow-sounding when tapped, it’s not ready.
Pro tip: Test multiple pumpkins in a batch—maturity can vary even among the same vine. I once harvested a tray of butternuts, only to find that 30% were still underripe because I relied on size alone. The finger-nail test saved my next batch from disappointment!
Timing is everything with butternut pumpkins. Harvest too early, and you’ll end up with watery, seedy flesh that lacks the rich, nutty flavor we all love. Wait too long, and the pumpkins become prone to disease or develop a woody texture.
The finger-nail test eliminates guesswork by focusing on two non-negotiable signs: skin hardness and stem dryness. When both are present, you’re golden.
One common mistake I see is testing the wrong spot. Always press near the stem end—the skin there is thicker and more reliable than the sides. Another pitfall? Ignoring the weather.
If a hard frost is forecast within 3–5 days, harvest even if the pumpkin isn’t perfectly ripe. Butternuts are frost-sensitive, and cold temperatures turn their flesh mealy and bland.
For extra accuracy, combine the finger-nail test with visual cues. Look for a dull, matte rind (not shiny) and yellowing vines. These signs confirm that the pumpkin is photosynthetically mature and ready to be picked. Once you’ve mastered this method, you’ll never second-guess your harvest timing again!
Remember: The earlier you harvest after passing the finger-nail test, the better the flavor. Butternuts continue to ripen slightly after picking, so don’t wait until the last possible moment—aim to harvest 1–2 days after the test confirms readiness for peak sweetness.
5 Additional signs your butternut pumpkins are ready to harvest
Beyond the classic finger-nail test, butternut pumpkins reveal subtle clues they're ready to harvest. I've learned these signs save my harvest from either underripe blandness or frost damage.
First, watch for the rind color change—when it shifts from green to a dull tan or beige, that's your first visual cue.
The stem drying is another critical signal. When the vine's stem turns brown and begins to withdraw from the pumpkin, it's nature's way of saying "pick me now." I always check this before relying on other signs, as it's the most reliable indicator of maturity.
Here are the five key signs I watch for, beyond the nail test, to ensure perfect timing:
Each of these signs works together to confirm harvest readiness. For example, a tan rind plus a dry stem means your pumpkin is nearly perfect. But if the vines yellow before these signs appear, frost is coming—harvest immediately even if slightly underripe.
Harvesting too early means watery flesh and poor storage life, while waiting too long risks frost damage that turns sweet pumpkins bitter. In my Zone 6a garden, I aim to harvest by October 1st to avoid early frosts that can ruin weeks of care.
Pro tip: Cut the stem with a clean knife rather than twisting it off. This prevents disease entry points and extends storage life. Store your pumpkins in a cool, dry place with good airflow to maintain their sweetness for months.